Envision Windows Installation Instructions

- Rough opening must be square (diagonals measure the same) and plumb; and the sill plate must be level. Wrapping the rough opening is not required or recommended. Check building codes for local requirements. Nail fin should attach directly to sheathing.
- Keep window locked until installation is complete.
- Caulking the back side of the nail fin is not required or recommended.
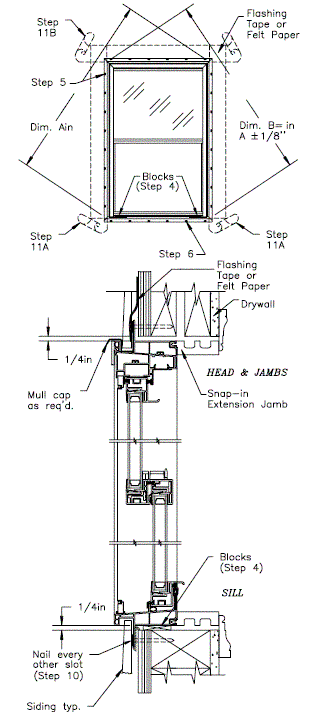
- Place the unit in the opening. Block the sill of the window from the sill plate of the opening near both jambs to provide equal clearance at the head and sill. Do not block or shim under the center section of the sill.
- Center the unit in the opening. Using 1¾" roofing nails or staples, fasten one top corner of nailing flange to sheathing.
- Making sure that the unit is level, remove or adjust sill blocks as necessary. Nail the diagonally opposite corner in place.
- Square the window by adjusting the unfastened corners until diagonal dimensions "A" and "B" measure equal ±⅛" and reveal across bottom sash at the sill is straight and even. Nail or staple the remaining two corners.
- Shim jambs at meeting rail or where ever necessary to eliminate all bowing in frame and maintain equal margins between sash and frame.
- Loosely fill any gaps between the frame and rough opening with insulation. Never use expandable foam type insulation as bowed, twisted frame members may result.
- Fasten the entire perimeter of the frame to the sheathing using nails or staples at alternating holes. Verify that window operates correctly.
- Flash perimeter of window with flashing tape or felt paper as shown. Apply flashing over nailing fins in this order: 11A - jambs, 11B - head. If house wrap is used, the top piece of flashing must be inserted under the house wrap to properly shed water.
- Leave ¼" gap between window and all masonry for expansion and contraction. Caulk gap with silicone caulk.
Printable Envision Installation Instructions


